Orange peel in paint is caused by improper spraying technique or environmental factors such as high humidity or improper temperature. This issue results in a bumpy texture on the painted surface, resembling the skin of an orange.
Achieving a flawless paint finish is essential for any project, whether it’s a DIY home improvement task or a professional automotive paint job. However, encountering orange peel can be frustrating. Understanding the causes of this issue is crucial for preventing it in the future.
We will explore the various factors that contribute to orange peel in paint, providing insights into how to address and avoid this common problem. By the end, you’ll have a comprehensive understanding of the causes of orange peel in paint and how to tackle this issue effectively.
Credit: www.hmgpaint.com
Contents
- Introduction To Orange Peel In Paint
- The Science Behind Paint Orange Peel
- Key Factors Contributing To Orange Peel
- Role Of Environmental Conditions
- Technique Troubles Leading To Orange Peel
- Equipment Quality And Maintenance
- Preparation Steps To Prevent Orange Peel
- Solutions And Fixes For Orange Peel
- Conclusion: Ensuring A Smooth Finish
- Frequently Asked Questions
- Conclusion
Introduction To Orange Peel In Paint
When it comes to achieving a flawless paint finish, encountering orange peel texture can be frustrating. Understanding the causes and misconceptions about this issue is crucial for achieving professional results. In this blog post, we’ll delve into the introduction of orange peel in paint, identify the texture, and debunk common misconceptions about paint finishes.
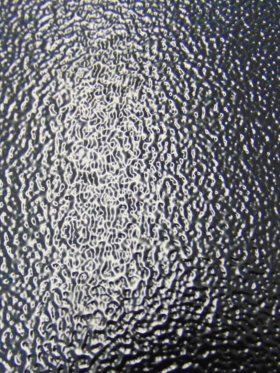
Identifying Orange Peel Texture
Identifying orange peel texture is essential for effectively addressing the issue. This texture resembles the surface of an orange, with a dimpled and uneven appearance. When light reflects off the surface, it appears wavy and uneven. Understanding and recognizing this texture is the first step toward resolving the problem.
Common Misconceptions About Paint Finishes
There are several misconceptions surrounding paint finishes and orange peel texture. One common misconception is that orange peel is solely caused by the paint itself. However, factors such as application technique, environmental conditions, and surface preparation also play significant roles in the development of this texture. Addressing these misconceptions is essential for effectively preventing and resolving orange peel issues.

Credit: ccsyacht.com
The Science Behind Paint Orange Peel
The Role Of Paint Viscosity
Paint viscosity plays a crucial role in the formation of orange peel. Viscosity refers to the thickness or flow resistance of the paint. When the paint’s viscosity is too high, it can lead to an uneven application and the formation of orange peel. On the other hand, if the viscosity is too low, it can cause the paint to run or sag, resulting in a similar texture. Achieving the right viscosity is essential for a smooth and uniform paint finish.
How Surface Tension Impacts Finish
Surface tension also contributes to the development of orange peel in paint. Surface tension is the tendency of a liquid surface to shrink into the minimum surface area possible. When the surface tension of the paint is not properly managed, it can lead to the formation of uneven textures, including orange peel. Controlling and adjusting the surface tension of the paint is vital in achieving a flawless, smooth finish.
Key Factors Contributing To Orange Peel
Orange peel is a common problem that can occur when painting surfaces, resulting in a textured finish that resembles the skin of an orange. Several factors can contribute to this issue, including inadequate paint thinning and incorrect spray gun settings. Understanding these key factors is essential for achieving a smooth and professional-looking paint job.
Inadequate Paint Thinning
Inadequate paint thinning is one of the primary culprits behind orange peel. When paint is not thinned properly, it becomes too viscous and difficult to atomize effectively. This can lead to an uneven application, resulting in a textured finish. To ensure proper paint thinning, consult the manufacturer’s instructions for the specific paint product being used. It’s important to achieve the right consistency to allow for smooth spraying and drying.
Incorrect Spray Gun Settings
The spray gun settings play a crucial role in achieving a flawless paint finish. When the spray gun is not set correctly, it can result in excessive paint flow or uneven distribution, leading to orange peel. The air pressure, fluid flow, and fan pattern settings should be adjusted according to the paint being used and the desired finish. It is essential to take the time to calibrate the spray gun properly before starting the painting process to minimize the risk of orange peel.
By addressing these key factors, you can significantly reduce the occurrence of orange peel in your paint job. Proper paint thinning and correct spray gun settings are vital for achieving a smooth and professional-looking finish. Take the time to understand and implement these factors, and you’ll be on your way to achieving a flawless paint job.

Credit: www.drbeasleys.com
Role Of Environmental Conditions
In the world of painting, achieving a smooth, flawless finish is the ultimate goal. However, sometimes, you may encounter a frustrating issue known as orange peel. This phenomenon causes the painted surface to resemble the texture of an orange peel, with a bumpy, uneven appearance. While there can be several reasons for orange peel, one significant factor is the role of environmental conditions. The temperature, humidity, and air flow during the painting process can greatly influence the occurrence of orange peel in paint.
Temperature And Humidity Effects
The temperature and humidity levels in the painting environment play a crucial role in the formation of orange peel. When the temperature is too high, the solvent within the paint evaporates rapidly, leading to a quick drying process. This rapid evaporation can result in insufficient time for the paint to level out and settle smoothly on the surface. Similarly, high humidity levels can slow down the drying process, preventing the paint from properly flowing and leveling.
On the other hand, low temperatures can cause the paint to become thicker, making it difficult for it to spread evenly. Additionally, low humidity levels can cause the paint to dry too quickly, leading to a lack of time for the solvents to evaporate properly, resulting in an uneven surface.
Air Flow And Its Impact On Drying
The airflow in the painting area also has a significant impact on the occurrence of orange peel. Insufficient air circulation can lead to the accumulation of solvents and moisture in the air, which can affect the drying process. Without proper ventilation, the solvents may not evaporate effectively, leading to the formation of orange peel.
Similarly, excessive air flow can cause the paint to dry too quickly, increasing the chances of orange peel formation. The fast drying process hinders the leveling ability of the paint, preventing it from settling smoothly on the surface.
Therefore, it is essential to maintain a suitable temperature, humidity, and air flow during the painting process to minimize the occurrence of orange peel. By creating an environment that promotes proper drying and leveling of the paint, you can achieve a flawless, professional finish.
Technique Troubles Leading To Orange Peel
Orange peel in paint is often caused by technique troubles. Issues like improper spray gun settings, incorrect paint viscosity, or inadequate surface preparation can lead to this texture problem. Understanding the root causes can help in preventing and resolving orange peel issues for a smoother finish.
The Importance Of Spray Technique
When it comes to achieving a smooth and flawless paint finish, the spray technique plays a crucial role. A poor technique can result in orange peel, a common paint defect that can be frustrating to deal with. To avoid this issue, it is important to ensure that the spray gun is held at the correct distance and angle, and that the painter is using the right amount of pressure.Distance And Angle Of The Spray Gun
One of the main causes of orange peel in paint is improper distance and angle of the spray gun. Holding the gun too far away from the surface can cause the paint to dry before it hits the surface, resulting in a rough texture. On the other hand, holding the gun too close can cause the paint to run, resulting in drips and sags. Similarly, holding the gun at the wrong angle can cause the paint to pool and create an uneven texture. To avoid these issues, it is important to hold the gun at the correct distance and angle. Typically, the gun should be held between 6 and 8 inches away from the surface, at a 90-degree angle. However, this may vary depending on the type of paint being used and the surface being painted. Orange peel is a common paint defect that can be caused by a variety of factors, including improper technique. Spray technique plays a crucial role in achieving a smooth and flawless paint finish. Holding the gun too far away or too close, or at the wrong angle, can result in orange peel and other texture issues. To avoid this problem, it is important to ensure that the spray gun is held at the correct distance and angle, and that the painter is using the right amount of pressure. By paying attention to these factors, painters can achieve a smooth and professional-looking paint finish.Equipment Quality And Maintenance
Orange peel in paint is often caused by equipment quality and maintenance issues. Poorly maintained spray guns or incorrect pressure settings can result in an uneven texture, resembling the skin of an orange. To avoid this, regular cleaning and proper equipment calibration are essential for achieving a smooth and flawless paint finish.
Choosing The Right Spray Gun
A high-quality spray gun is essential to achieve a smooth and even paint finish without orange peel. When choosing a spray gun, it’s important to consider factors such as the type of paint, the material being painted, and the size of the project. Additionally, selecting a spray gun with adjustable pressure and fan controls can help ensure optimal paint distribution and reduce the risk of orange peel.Regular Equipment Cleaning And Care
Proper maintenance and cleaning of your painting equipment can also help prevent orange peel. Regularly flushing out the spray gun with a cleaning solution and inspecting the nozzle for blockages can help ensure optimal performance. It’s also important to clean and replace any worn or damaged parts, such as gaskets or seals, to prevent leaks that can cause uneven paint application. In conclusion, investing in high-quality equipment and regularly maintaining and cleaning your spray gun can help prevent the occurrence of orange peel in your paint job. By following these tips, you can achieve a professional-looking finish that is free from imperfections.Preparation Steps To Prevent Orange Peel
When it comes to achieving a smooth and flawless paint finish, proper preparation is key. Orange peel, a common issue in paint application, can be prevented by following the right steps. By implementing surface preparation best practices and applying the primer correctly, you can avoid the frustration of dealing with an uneven texture. Let’s dive into the essential preparation steps that can help you prevent orange peel in your paint job.
Surface Preparation Best Practices
Before applying any paint, it is crucial to prepare the surface properly. Here are some best practices to follow:
- Start by cleaning the surface thoroughly to remove any dirt, dust, or grease. This can be done using a mild detergent and water solution.
- Next, ensure that the surface is completely dry before proceeding. Moisture can affect the paint adhesion and result in orange peel.
- Inspect the surface for any imperfections such as cracks, dents, or uneven areas. Use a suitable filler or putty to repair and smoothen these issues.
- Sand the surface using fine-grit sandpaper to create a smooth and even texture. This step helps the primer and paint adhere properly.
- After sanding, remove any dust or debris using a tack cloth or a lint-free cloth. This ensures a clean surface for the primer application.
Primer Application Techniques
The primer plays a crucial role in achieving a smooth paint finish. Here are some techniques to consider when applying the primer:
- Choose a high-quality primer suitable for the surface you are working on. Different surfaces may require specific primers, so ensure you select the right one.
- Follow the manufacturer’s instructions regarding the mixing ratio and application method.
- Apply the primer using a high-quality paintbrush, roller, or spray gun, depending on the surface and your preference. Ensure even coverage without over-applying.
- Allow the primer to dry completely according to the recommended drying time. This step is crucial before proceeding with the paint application.
- Inspect the primed surface for any imperfections. If needed, lightly sand the surface again to achieve a smooth texture.
By following these preparation steps and techniques, you can minimize the occurrence of orange peel in your paint job. Taking the time to properly prepare the surface and apply the primer will result in a professional-looking finish that you can be proud of.
Solutions And Fixes For Orange Peel
If you’ve noticed orange peel texture on your freshly painted surface, don’t worry! There are several solutions and fixes available to help you achieve a smooth, flawless finish. In this section, we will explore two key techniques: sanding and buffing, as well as determining when it’s necessary to repaint based on the severity of the orange peel.
Sanding And Buffing Techniques
If you’re dealing with minor orange peel, sanding and buffing can often be effective in improving the appearance of your paint job. Here’s a step-by-step guide on how to do it:
- Start by gently sanding the affected area with fine-grit sandpaper. Use a circular motion and apply even pressure.
- After sanding, wipe away the dust with a clean, lint-free cloth.
- Next, apply a polishing compound to a buffing pad and work it into the surface using a low-speed buffer. Move the buffer in overlapping motions to ensure even coverage.
- Continue buffing until the orange peel texture is no longer visible and the paint appears smooth.
- Finally, wipe off any residue with a clean cloth and inspect the surface to ensure the desired results have been achieved.
Remember, proper technique and patience are crucial when sanding and buffing to avoid damaging the paint.
When To Repaint: Assessing The Severity
In some cases, the orange peel may be too severe to fix with sanding and buffing alone. Assessing the severity of the issue will help determine if repainting is necessary. Here are a few signs that indicate it may be time to repaint:
- Deep and noticeable orange peel texture across the entire painted surface.
- Uneven distribution of paint, with some areas appearing thicker or thinner than others.
- Large areas of paint sagging or running due to excessive application.
- Multiple layers of paint that have resulted in an uneven texture.
If you encounter any of these issues, it’s best to consider repainting the surface to achieve a smooth and professional finish.
By utilizing the sanding and buffing techniques for minor orange peel and knowing when to repaint for more severe cases, you can address the issue effectively and achieve the flawless paint job you desire.
Conclusion: Ensuring A Smooth Finish
When it comes to achieving a flawless paint finish, understanding the causes of orange peel and the prevention techniques is crucial. By implementing the right strategies and being patient, you can ensure a smooth, professional-looking result for your paint projects.
Summary Of Key Prevention Tips
Here are some key prevention tips to help you avoid the occurrence of orange peel in your paint:
- Use the right viscosity of paint.
- Ensure proper surface preparation.
- Opt for high-quality painting tools and equipment.
- Apply paint in thin, even coats.
- Monitor environmental conditions such as temperature and humidity.
The Value Of Patience And Practice
Patience and practice are essential in achieving a smooth paint finish. Taking the time to master your painting techniques and being patient during the application process can significantly reduce the likelihood of orange peel. With consistent practice, you can hone your skills and produce professional results with confidence.
Frequently Asked Questions
How Do You Stop Orange Peel On Paint?
To prevent orange peel on paint, you need to ensure that the surface is clean and free of debris before painting. Use high-quality paint and a suitable roller or brush for the type of surface you’re painting. Avoid over-applying the paint, and maintain a consistent speed and pressure while painting.
Allow the paint to dry completely before applying a second coat.
Is Orange Peel Bad For Paint?
Orange peel can be bad for paint, causing an uneven texture. It results from improper application and can be fixed with sanding and polishing.
How To Fix Orange Peel Paint On Walls?
To fix orange peel paint on walls, sand the surface lightly, apply a skim coat of joint compound, sand again, and then prime and repaint the wall.
What Causes Orange Peel In Single Stage Paint?
Orange peel in single stage paint is caused by a lack of proper atomization of the paint during application. This can occur due to several reasons, such as incorrect air pressure, improper spray gun setup, or incorrect viscosity of the paint.
Using the correct equipment and techniques can help prevent this issue.
Conclusion
To sum up, orange peel in paint is a common issue that can be caused by a variety of factors. These may include improper surface preparation, incorrect application technique, or even the type of paint used. However, by taking the time to properly prepare surfaces, selecting the right paint, and using the correct application method, you can minimize the risk of orange peel and achieve a smooth, professional-looking finish.
Remember that prevention is key, and always take the necessary steps to ensure a successful paint job.