Paint transfer on your car often happens from minor scrapes, like bumping into another vehicle, a garage wall, or a post. While it can be frustrating to see unsightly paint marks on your car’s surface, the good news is that you can often remove paint transfer quickly and inexpensively using toothpaste. Toothpaste, a mild abrasive, can buff out the transferred paint without harming your car’s finish.
In this comprehensive guide, you’ll learn how to remove paint transfer from your car using toothpaste, why this method works, and how to protect your car’s paint afterward.
Contents
- Why Use Toothpaste to Remove Paint Transfer?
- Tools and Materials You Will Need
- Safety Tips Before You Start
- Understanding Paint Transfer vs. Scratches
- Step-by-Step Guide to Removing Paint Transfer with Toothpaste
- How Many Times Should You Repeat the Process?
- Alternative Methods to Remove Paint Transfer from a Car
- How to Prevent Paint Transfer on Your Car
- How to Fix Clear Coat Damage from Paint Transfer
- Common Mistakes to Avoid When Removing Paint Transfer
- When to Seek Professional Help
- Cost Comparison: DIY vs. Professional Paint Transfer Removal
- Frequently Asked Questions (FAQs)
- Conclusion
Why Use Toothpaste to Remove Paint Transfer?
Mild Abrasive Properties
- Toothpaste contains mild abrasives designed to remove stains from teeth, making it effective for buffing out light paint marks without scratching your car’s clear coat.
Affordable and Accessible
- Most people already have toothpaste at home, making it a convenient and cost-effective solution.
Safe for Car Paint
- Non-gel, non-whitening toothpaste is gentle and safe on automotive finishes when used correctly.
Quick and Easy Application
- Toothpaste requires no special equipment, and you can often complete the process in under 30 minutes.
Tools and Materials You Will Need
Tools
- Microfiber cloths (2 or more)
- Soft sponge (optional)
- Bucket of water
- Spray bottle (optional)
Materials
- Non-gel, non-whitening toothpaste (white paste type)
- Car wash soap or mild dish soap
- Car wax or polish (for finishing)
Safety Tips Before You Start
- Work in a shaded area: Avoid direct sunlight, which can cause the toothpaste to dry too quickly.
- Test in a small area: Before applying toothpaste to a large section, test on a small, inconspicuous spot to ensure it doesn’t affect the paint.
- Use soft materials: Always use microfiber cloths to avoid scratching the surface.
Understanding Paint Transfer vs. Scratches
What is Paint Transfer?
Paint transfer happens when another object’s paint rubs onto your car’s surface. It sits on top of your car’s clear coat and can usually be removed without repainting.
How to Check if It’s Transfer or a Scratch
- Run your fingernail over the mark: If your fingernail doesn’t catch on it, it’s likely just paint transfer and can be removed with toothpaste.
- Check for color differences: If the mark is a different color than your car, it’s probably paint transfer.
Step-by-Step Guide to Removing Paint Transfer with Toothpaste
Step 1: Wash the Affected Area
- Mix car wash soap with water: Use a bucket or spray bottle.
- Clean the area with a microfiber cloth or sponge: Remove any dirt or debris to prevent scratches.
- Rinse thoroughly: Wipe the area with a clean, damp microfiber cloth.
- Dry completely: Use another microfiber cloth to dry the surface.
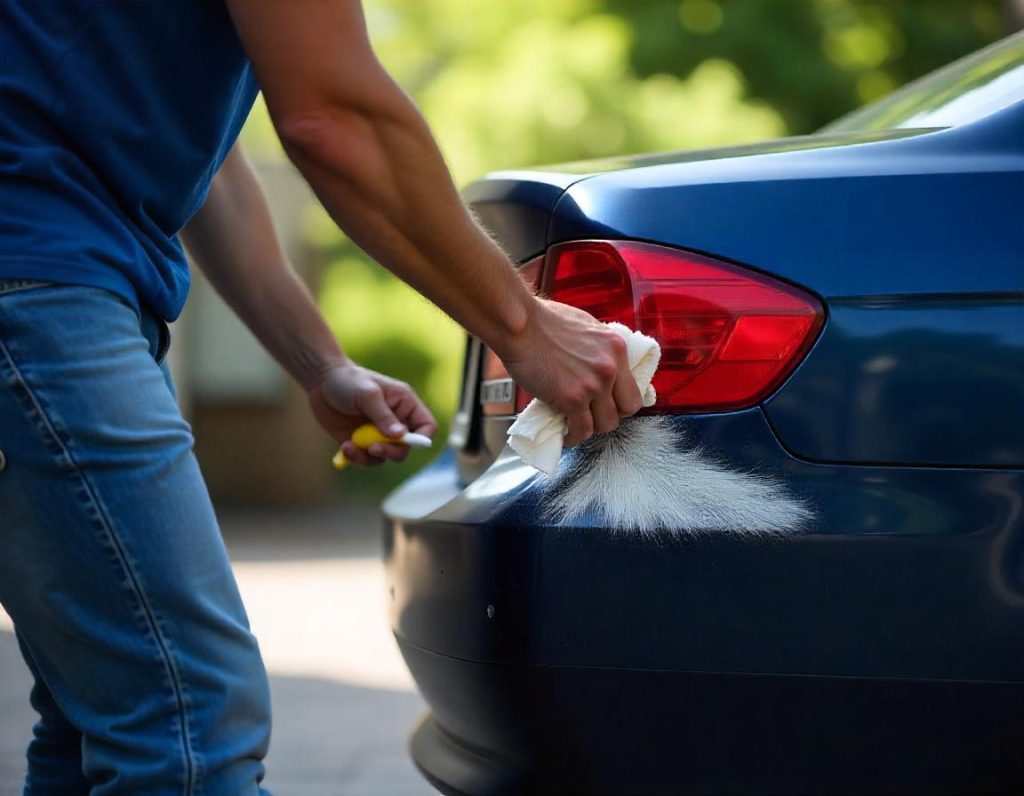
Step 2: Apply the Toothpaste
- Choose the right toothpaste: Use a white, non-gel, non-whitening toothpaste.
- Place a small amount on a microfiber cloth: About a pea-sized amount is enough for a small area.
Step 3: Rub the Toothpaste Into the Paint Transfer
- Use gentle, circular motions: Buff the area for about 1–2 minutes.
- Apply even pressure: Avoid pressing too hard, which could damage the clear coat.
- Check progress frequently: Wipe away the toothpaste and inspect the area.
Step 4: Wipe and Inspect
- Dampen a microfiber cloth with water: Wipe away the toothpaste residue.
- Check if the paint transfer is gone: Repeat the process if necessary.
Step 5: Rinse and Dry
- Rinse the area thoroughly with water: Remove any remaining toothpaste.
- Dry with a clean microfiber cloth: Prevent water spots from forming.
Step 6: Polish and Protect the Paint
- Apply car polish or wax: Use a microfiber cloth to buff the surface.
- Polish in circular motions: Enhance the shine and protect the paint.
- Allow the wax to dry and buff off: Finish with a clean microfiber cloth.
How Many Times Should You Repeat the Process?
- Light paint transfer usually disappears after one or two applications of toothpaste.
- For more stubborn marks, you may need to repeat the process up to three times.
Alternative Methods to Remove Paint Transfer from a Car
Using Baking Soda and Water
- Mix baking soda with water: Create a paste.
- Apply with a microfiber cloth: Rub in circular motions.
- Rinse and dry: Wipe away any residue.
Using Rubbing Alcohol
- Dampen a cloth with rubbing alcohol: Gently rub the transfer area.
- Check progress regularly: Avoid over-rubbing.
- Rinse and polish: Finish with wax to restore the shine.
Using a Magic Eraser (Use with Caution)
- Dampen the Magic Eraser: Lightly buff the transfer mark.
- Check frequently: Magic Erasers can be abrasive, so be cautious.
How to Prevent Paint Transfer on Your Car
Park Strategically
- Choose spots away from high-traffic areas and other cars.
Use Protective Films or Wraps
- Clear protective films help prevent minor scrapes.
Apply a Ceramic Coating
- Ceramic coatings make it harder for paint transfer to stick.
Wax Your Car Regularly
- Waxing adds a protective barrier to your car’s paint.
How to Fix Clear Coat Damage from Paint Transfer
If the paint transfer removal process leaves dull spots or minor clear coat scratches, you can:
- Use a scratch remover: Such as Meguiar’s ScratchX or 3M Scratch Remover.
- Buff with a dual-action polisher: For larger areas or deeper damage.
- Reapply wax or sealant: Protect the repaired area.
Common Mistakes to Avoid When Removing Paint Transfer
- Using the wrong toothpaste: Avoid gel, colored, or whitening toothpaste, which can be too abrasive or leave stains.
- Rubbing too hard: Excessive pressure can damage the clear coat.
- Skipping the wax step: Without waxing, the repaired area is left unprotected.
- Not cleaning first: Dirt on the surface can cause scratches.
When to Seek Professional Help
- If the scratch is deep: You can feel it with your fingernail.
- If the paint is chipped: You may need touch-up paint.
- If the transfer covers a large area: A professional detailer can remove it more efficiently.
Cost Comparison: DIY vs. Professional Paint Transfer Removal
| Method | Average Cost | Effectiveness |
|---|---|---|
| Toothpaste (DIY) | $1–$5 (household item) | High (for minor transfers) |
| Baking Soda (DIY) | $2–$5 | Moderate |
| Rubbing Alcohol (DIY) | $3–$7 | Moderate |
| Professional Detailing | $100–$250 | High (all types of transfers) |
Frequently Asked Questions (FAQs)
Can toothpaste remove deep scratches?
No, toothpaste is effective for surface-level paint transfer and minor scuffs but not deep scratches that reach the primer or metal.
Is whitening toothpaste safe for car paint?
No, whitening toothpaste contains harsh abrasives that can dull your car’s clear coat. Use only plain white, non-gel toothpaste.
How long should I rub the toothpaste on the car?
Buff for about 1–2 minutes, checking frequently to avoid over-polishing.
Should I wax the car after using toothpaste?
Yes, waxing helps seal and protect the paint, restoring its shine and providing a protective layer.
Conclusion
Removing paint transfer from your car with toothpaste is a simple, affordable, and effective DIY solution. With just a few household items and careful technique, you can restore your car’s finish without expensive professional repairs.
Follow the steps outlined here—cleaning, applying toothpaste, buffing, and finishing with wax—for the best results. By protecting your car’s paint with regular waxing and careful parking habits, you can reduce the chances of future paint transfer incidents.