Painting a refrigerator is a cost-effective way to update your kitchen’s look without buying a new appliance. Whether you want to refresh an old fridge or give it a modern color twist, painting it can be a fun and rewarding DIY project.
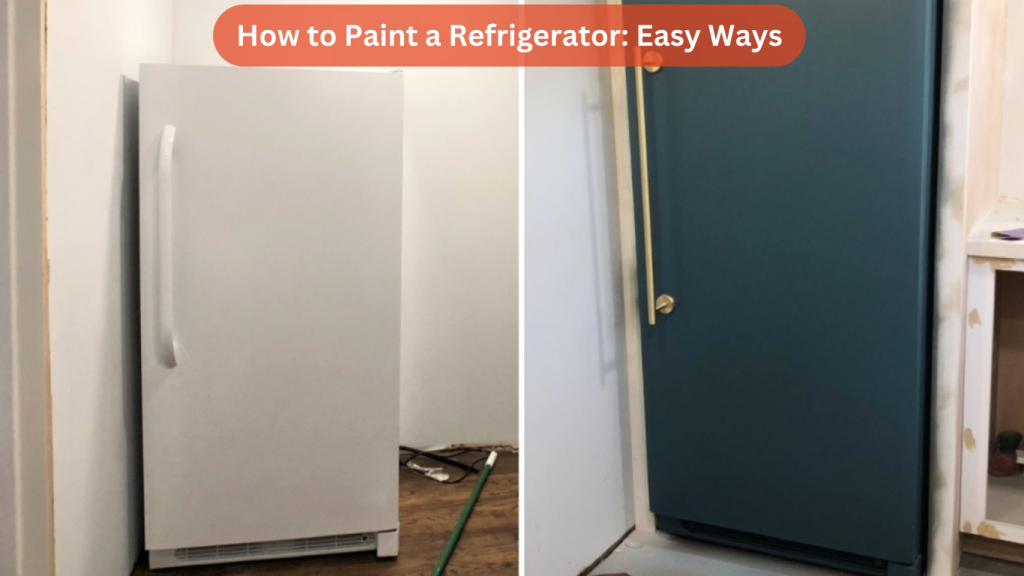
This guide will walk you through the steps of painting your refrigerator, covering different techniques and tips to ensure a flawless finish. Let’s dive in!
Contents
Why Paint Your Refrigerator?
Benefits of Painting a Refrigerator
Painting your refrigerator offers several advantages:
- Cost-Effective Makeover: It’s cheaper to paint a fridge than to buy a new one.
- Custom Colors: You can choose any color to match your kitchen decor.
- Eco-Friendly: Extending the life of your refrigerator reduces waste.
When to Consider Painting Your Refrigerator
- Old but Functional Fridge: If your refrigerator is in good working condition but looks outdated.
- Scratched or Dented Surface: To cover up minor imperfections.
- Style Update: To match a new kitchen theme or color scheme.
Materials Needed
Essential Supplies
- Appliance Paint or Spray Paint: Designed for metal surfaces to ensure durability.
- Sandpaper (120-220 grit): To smooth the surface for paint adhesion.
- Primer: For a smooth base coat, especially if the fridge is dark or has rust.
- Painter’s Tape: To protect areas that you don’t want to paint.
- Drop Cloth or Plastic Sheeting: To protect the floor and surrounding area.
- Cleaning Supplies: Dish soap, water, and a degreaser to clean the surface.
Optional Tools
- Paint Roller or Brush: For applying paint if you’re not using spray paint.
- Screwdriver: To remove handles or any detachable parts.
- Protective Mask and Gloves: To ensure safety while working with paint fumes.
Step 1: Prepare the Refrigerator
Unplug and Empty the Refrigerator
Before starting the painting process:
- Unplug the Refrigerator: Safety first—always disconnect the appliance.
- Empty the Contents: Remove all food, shelves, and trays.
Clean the Surface
- Wash with Soapy Water: Use warm, soapy water to clean the exterior.
- Degrease the Surface: Remove any grease or dirt using a degreaser.
- Dry Thoroughly: Make sure the surface is completely dry before moving on to the next step.
Remove Hardware and Mask Off Areas
- Remove Handles and Trim: Use a screwdriver to take off any detachable parts.
- Use Painter’s Tape: Tape off areas you don’t want to paint, like the rubber seals and the power cord.
Step 2: Sand and Prime the Surface
Sanding the Refrigerator
- Sand the Surface Lightly: Use 120-220 grit sandpaper to lightly sand the entire fridge. This step helps the paint adhere better.
- Wipe Away Dust: Use a damp cloth to remove any dust created by sanding.
Applying Primer
- Choose the Right Primer: Use a primer designed for metal surfaces.
- Apply Evenly: Use a roller or spray to apply the primer evenly over the fridge.
- Let It Dry: Allow the primer to dry completely according to the manufacturer’s instructions.
Step 3: Paint the Refrigerator
Choosing the Right Paint
- Appliance Paint: Specifically designed for durability on appliances.
- Spray Paint: Ideal for a smooth, streak-free finish.
- Chalkboard Paint: For a fun, writable surface on your fridge.
Painting Techniques
Method 1: Using Spray Paint
- Shake the Can Well: To ensure even color distribution.
- Apply Thin Coats: Spray the paint in light, even coats, holding the can about 12 inches away from the surface.
- Let Each Coat Dry: Allow each coat to dry before applying the next, usually 15-20 minutes.
- Apply Multiple Coats: Continue applying coats until you achieve a uniform color.
Method 2: Using a Paint Roller or Brush
- Pour the Paint: Into a paint tray for easy access.
- Use Even Strokes: Apply the paint with a roller or brush in long, even strokes.
- Let It Dry: Allow the first coat to dry before applying additional layers.
- Sand Between Coats: Lightly sand with fine-grit sandpaper for a smooth finish.
Drying Time
- Dry Completely: Let the refrigerator dry for at least 24 hours before reassembling or using it.
Step 4: Finishing Touches
Reattach Hardware
- Reinstall Handles and Trim: Once the paint is completely dry, reattach any hardware you removed.
Clean Up
- Remove Painter’s Tape: Carefully peel off the painter’s tape from the areas you masked.
- Wipe the Surface: Use a dry cloth to remove any dust or particles.
Final Inspection
- Check for Flaws: Look for any drips or uneven areas and touch them up if necessary.
- Let It Cure: Allow the paint to cure fully for a few days before plugging the refrigerator back in.
Tips for a Professional Finish
Work in a Well-Ventilated Area
Painting in a well-ventilated area or outdoors helps reduce exposure to fumes and allows the paint to dry more evenly.
Avoid Drips and Streaks
- Thin Coats are Key: Applying thin coats prevents drips and ensures a smooth finish.
- Maintain a Steady Hand: Consistency in your brush or spray motion will lead to a more even coat.
Temperature and Humidity
Paint in a cool, dry environment. High humidity can affect the drying time and the paint’s finish.
Common Mistakes to Avoid
Mistake 1: Skipping the Primer
- Problem: Without a primer, the paint might not adhere properly and could peel.
- Solution: Always use a primer, especially on slick surfaces.
Mistake 2: Rushing the Process
- Problem: Applying too many coats too quickly can lead to bubbles and drips.
- Solution: Allow each coat to dry completely before applying the next.
Mistake 3: Not Sanding the Surface
- Problem: Paint may not stick well to a smooth, glossy surface.
- Solution: Lightly sand the refrigerator to create a rough surface for the paint to grip.
FAQs About Painting a Refrigerator
1. Can I use regular paint on a refrigerator?
It’s best to use appliance paint or spray paint designed for metal surfaces to ensure durability.
2. How long does it take for the paint to dry completely?
Allow at least 24 hours for the paint to dry and a few days for it to cure fully.
3. Do I need to remove the doors to paint the refrigerator?
It’s not necessary, but removing the doors can make the painting process easier and more precise.
4. How do I prevent paint from chipping?
Use a primer and apply multiple thin coats of paint to create a durable finish.
5. Can I paint my fridge with chalkboard paint?
Yes, chalkboard paint is a fun option that turns your fridge into a writable surface.
Conclusion
Painting your refrigerator is a fantastic way to give your kitchen a fresh, updated look without the expense of buying a new appliance. By following the steps outlined in this guide, you can achieve a smooth, professional finish that will last for years.
Whether you opt for a bold color or a subtle shade, your newly painted fridge will become a stylish focal point in your kitchen. Happy painting!