To strip paint from a door, use a paint stripper and a scraper. Apply the paint stripper, wait for it to soften the paint, then use the scraper to remove the paint.
Painting a door can be a quick and easy way to update the look of a room, but if you’re dealing with layers of old paint, it can be a daunting task. Stripping paint from a door is a messy and time-consuming process, but it’s essential if you want to achieve a smooth, clean surface for painting.
There are several methods to strip paint from a door, including using a heat gun, sanding, and using a chemical paint stripper. We’ll focus on using a paint stripper, which is a popular and effective method. We’ll also provide some tips and tricks to make the process easier and safer.
Contents
- Introduction To Paint Stripping
- Selecting The Right Tools
- Choosing The Best Chemical Stripper
- The Heat Approach
- Manual Scraping Techniques
- Prepping The Door
- The Stripping Process
- Cleanup And Disposal
- Finishing Touches
- Prevention And Maintenance
- Troubleshooting Common Problems
- Frequently Asked Questions
- Conclusion
Introduction To Paint Stripping
Paint stripping is a common task when renovating a door, whether you’re restoring an old one or simply giving it a fresh look. Understanding the process of removing old paint is crucial to achieving a smooth and professional finish. In this guide, we’ll explore the reasons for stripping paint from a door and the essential safety measures to take before starting the project.
Why Remove Paint?
Before embarking on a paint stripping project, it’s important to understand the reasons behind the need to remove the existing paint. Over time, paint can become chipped, cracked, or discolored, detracting from the door’s overall appearance. Additionally, accumulated layers of paint can make it difficult to achieve a smooth, blemish-free finish when repainting. By stripping away old paint, you’ll create a clean surface, allowing for better adhesion and a more professional-looking result.
Safety First: Preparing To Strip Paint
When it comes to paint stripping, safety should always be the top priority. Before beginning the paint removal process, it’s essential to take the necessary precautions to protect yourself and the surrounding environment. This includes wearing protective gear such as gloves, safety goggles, and a mask to shield against potential exposure to harmful chemicals and fumes. Adequate ventilation in the work area is also crucial to minimize the inhalation of fumes and ensure a safe environment for paint stripping.
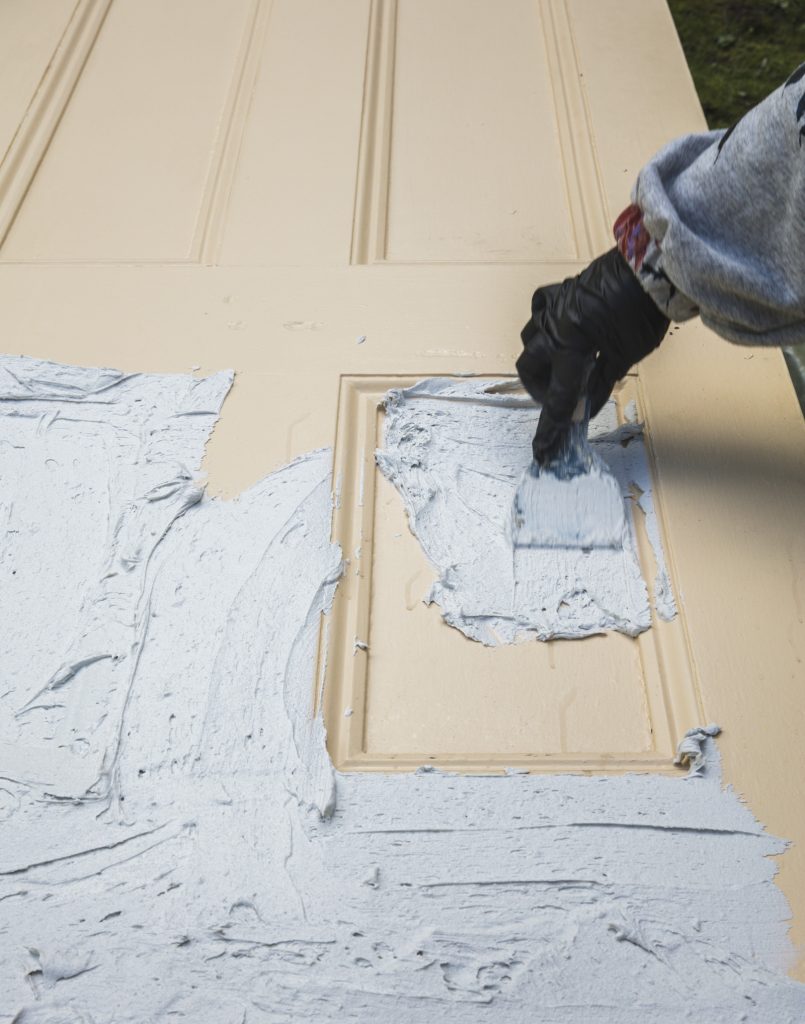
Credit: houseofbrinson.com
Selecting The Right Tools
When it comes to stripping paint from a door, selecting the right tools is essential for achieving the best results. Each method has its own advantages and considerations, so it’s important to understand the options available. Let’s explore the various tools and techniques that can be used to effectively strip paint from a door.
Chemical Strippers
Chemical strippers are a popular choice for removing paint from doors. They work by softening the paint so it can be easily scraped away. These strippers are available in a variety of formulas, including gel and liquid options. Gel strippers are ideal for vertical surfaces as they adhere well without dripping, while liquid strippers are suitable for horizontal surfaces. When using chemical strippers, it’s crucial to follow the manufacturer’s instructions and take necessary safety precautions.
Heat Guns And Infrared Devices
Heat guns and infrared devices are effective tools for stripping paint from doors, especially for removing multiple layers of paint or paint that is difficult to remove with other methods. These tools work by applying heat to the paint, causing it to soften and bubble, making it easier to scrape away. When using heat guns or infrared devices, it’s important to be cautious and avoid overheating the paint, as this can release harmful fumes.
Scrapers And Brushes
Scrapers and brushes are essential for physically removing softened paint from the door surface. A variety of scrapers and brushes are available, including putty knives, paint scrapers, and wire brushes, each designed for different types of paint and surfaces. It’s important to choose the right tool for the job to avoid damaging the door surface. Additionally, having a range of sizes and shapes of scrapers and brushes can help tackle different areas and details on the door.
Choosing The Best Chemical Stripper
If you want to strip paint from a door, using a chemical stripper can be a highly effective method. However, with so many options available, it can be challenging to determine which one is the best for your needs. In this section, we will discuss the different types of chemical strippers available and provide tips on how to apply them safely.
Types Of Chemical Strippers
When it comes to choosing a chemical stripper, you have several options to consider. Each type of stripper has its own advantages and disadvantages, so it’s important to choose the one that best suits your specific project. Here are the most common types of chemical strippers:
- Methylene Chloride-Based Strippers: These strippers are known for their effectiveness in removing multiple layers of paint. They work by dissolving the paint, making it easier to scrape off. However, it’s important to note that methylene chloride is a strong chemical and should be used with caution. Always read and follow the instructions carefully to ensure your safety.
- Citrus-Based Strippers: If you prefer a more environmentally friendly option, citrus-based strippers are a great choice. These strippers use natural solvents derived from citrus fruits to break down the paint. They are generally safer to use and have a pleasant smell. However, they may not be as effective on stubborn or multiple layers of paint.
- Paste Strippers: Paste strippers are thick and gel-like in consistency, making them ideal for vertical surfaces such as doors. They adhere well to the paint, allowing for longer dwell time and better penetration. Paste strippers are often formulated with methylene chloride or other strong solvents, so proper safety precautions should be taken when using them.
Applying The Chemical Stripper Safely
Before applying any chemical stripper, it’s important to take the necessary safety precautions to protect yourself and the surrounding area. Here are some guidelines to follow:
- Wear protective clothing, including gloves, goggles, and a respirator, to shield yourself from potential exposure to harmful chemicals.
- Work in a well-ventilated area or use a fan to ensure proper air circulation.
- Prepare the door by removing any hardware, such as handles or hinges, to facilitate the stripping process.
- Apply the chemical stripper evenly onto the surface of the door, following the instructions provided by the manufacturer.
- Allow the stripper to sit for the recommended amount of time, usually indicated on the product label.
- Using a scraper or a scrub brush, gently remove the softened paint from the door. Take care not to damage the wood or the door surface.
- Once the paint has been removed, clean the door thoroughly with water or a paint thinner to remove any residue.
- Dispose of the used stripper and any leftover paint in accordance with local regulations.
By choosing the best chemical stripper for your needs and applying it safely, you can effectively strip paint from your door and achieve a clean surface ready for refinishing or repainting.
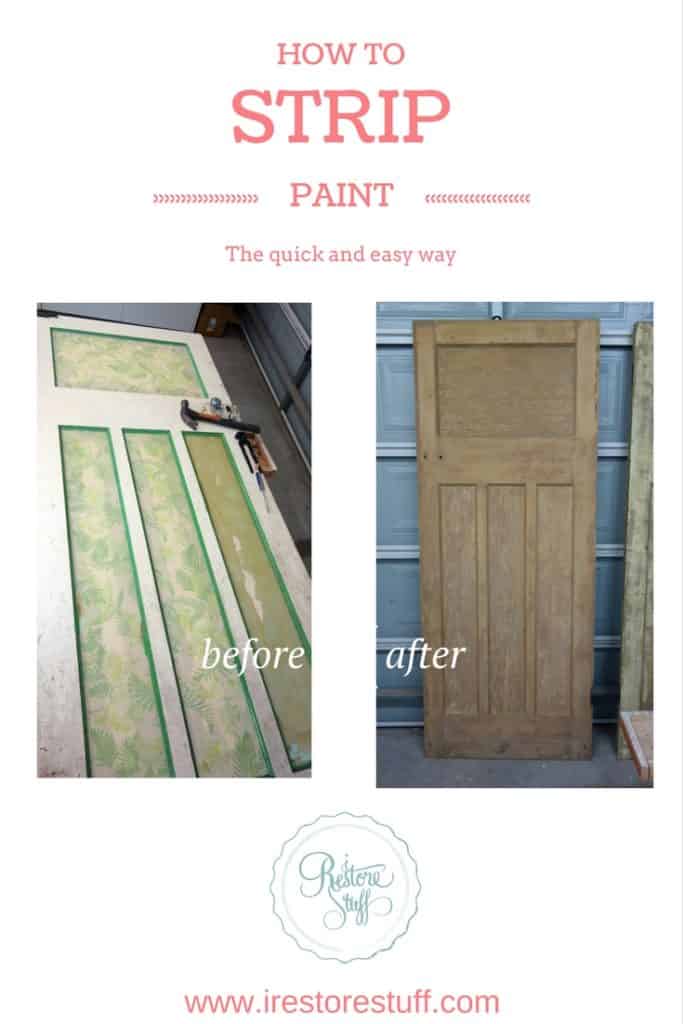
Credit: irestorestuff.com
The Heat Approach
When it comes to stripping paint from a door, one effective method is using heat. The heat approach involves using tools such as heat guns and infrared devices to soften the paint, making it easier to remove. This technique is particularly useful for removing multiple layers of paint or stubborn paint that is difficult to scrape off. In this section, we will explore how to use a heat gun and infrared devices for paint removal.
How To Use A Heat Gun
A heat gun is a versatile tool that emits hot air to soften and loosen paint. Follow these steps to effectively use a heat gun for paint removal:
- Put on safety gear, including goggles and heat-resistant gloves, to protect yourself from heat and flying debris.
- Plug in the heat gun and adjust the temperature settings according to the manufacturer’s instructions. Start with a lower heat setting and gradually increase if necessary.
- Hold the heat gun about 2-3 inches away from the painted surface and move it in a slow and steady motion. Avoid staying in one spot for too long to prevent scorching or damaging the door.
- As the paint begins to soften, use a scraper or putty knife to gently scrape off the loosened paint. Work in small sections to ensure thorough removal.
- Continue heating and scraping until all the paint is removed from the door. Take breaks if needed to avoid overheating the surface.
- Once the paint is stripped, use sandpaper or a sanding block to smooth out any remaining residue or imperfections on the door.
Infrared Devices For Paint Removal
Infrared devices are another effective option for paint removal. These devices use infrared heat to penetrate the layers of paint, causing them to bubble and separate from the surface. Here are a few key points to consider when using infrared devices:
- Choose a suitable infrared device based on the size of the door and the intensity of the paint layers.
- Position the device at a distance recommended by the manufacturer, typically a few inches away from the surface.
- Allow the infrared heat to penetrate the paint for a sufficient amount of time, usually a few minutes.
- Once the paint starts bubbling, use a scraper or putty knife to gently lift off the softened paint.
- Repeat the process until all layers of paint are removed from the door.
By following these steps and using the heat approach, you can effectively strip paint from a door using a heat gun or infrared device. Remember to always prioritize safety by wearing protective gear and following the manufacturer’s instructions for the tools you are using.
Manual Scraping Techniques
Learn effective manual scraping techniques to strip paint from a door. Start by using a paint scraper to remove the old paint, then sand the surface to smoothen it. Finish by wiping down the door to remove any remaining debris for a clean, paint-ready surface.
Proper Scraping Methods
Before beginning the scraping process, it’s important to ensure you have the proper tools. A handheld paint scraper, putty knife, and sandpaper are essential. Start by using the handheld scraper to remove any loose or flaking paint. Hold the scraper at a slight angle and use firm pressure to scrape the paint off the surface. Be careful not to gouge the wood or damage the door. Next, switch to the putty knife to remove any remaining paint. Hold the putty knife at a steeper angle than the scraper and use it to scrape the paint off in a smooth, steady motion. Be sure to work in small sections and apply firm pressure to avoid leaving behind any stubborn paint patches.Sanding After Scraping
Once all the paint has been removed, it’s time to sand the door to create a smooth surface for painting or staining. Start by using a medium-grit sandpaper to sand the entire door, working in the direction of the wood grain. Then, switch to a fine-grit sandpaper to create a smoother finish. Remember to sand any crevices or hard-to-reach areas with a sanding block. After sanding, use a damp cloth to wipe the door clean of any dust or debris. Then, inspect the door for any remaining paint patches or imperfections. If necessary, repeat the scraping and sanding process until the door is completely free of paint. In conclusion, manual scraping techniques are an effective way to remove paint from a door. By following proper scraping methods and sanding after scraping, you can achieve a smooth surface ready for painting or staining.Prepping The Door
To strip paint from a door, prepping it is crucial. Start by removing all hardware, sanding the surface, and applying a chemical stripper. Be sure to wear protective gear and work in a well-ventilated area for safety.
Before you start stripping the paint from your door, it is important to properly prep the door. This will ensure that the process goes smoothly and that the end result is a beautifully stripped door. There are a few key steps to follow when prepping your door, including removing hardware and cleaning the surface.Removing Hardware
The first step in prepping your door is to remove any hardware, such as hinges, knobs, and locks. This will make it easier to strip the paint from the door without damaging the hardware. Use a screwdriver to carefully remove the hardware and set it aside in a safe place.Cleaning The Surface
Once the hardware is removed, it is important to clean the surface of the door. This will remove any dirt, grime, or other debris that may be on the door and ensure that the paint stripper can properly adhere to the surface. You can use a variety of cleaning products, such as a degreaser or a solution of water and vinegar, to clean the door. Be sure to follow the manufacturer’s instructions for the cleaning product you choose. After cleaning the door, allow it to dry completely before moving on to the next step. Once the door is dry, you can begin the process of stripping the paint. By properly prepping the door, you can ensure that the stripping process goes smoothly and that the end result is a beautifully stripped door.The Stripping Process
To strip paint from a door, start by removing any hardware and sanding the surface. Next, apply a paint stripper and let it sit for the recommended time. Then, use a scraper or steel wool to remove the paint. Finally, sand the surface again and wipe it clean.
Repeat the process if necessary.
Applying The Stripper
Before you begin stripping the paint from your door, it’s important to gather the necessary materials. You’ll need a paint stripper, protective gloves, safety goggles, a paintbrush, and a plastic scraper. Once you have everything ready, follow these steps to apply the stripper:
- Put on your protective gloves and safety goggles.
- Open the windows in the room to ensure proper ventilation.
- Using a paintbrush, apply a thick coat of the paint stripper to the door’s surface. Make sure to cover the entire area evenly.
- Allow the stripper to sit on the door for the recommended amount of time specified on the product label. This will typically be around 15-30 minutes.
- While waiting, avoid touching the stripper or the door to prevent any potential skin irritation.
Removing The Paint
Once the paint stripper has had enough time to work its magic, it’s time to remove the old paint from your door. Follow these steps:
- Put on your protective gloves and safety goggles.
- Using a plastic scraper, gently scrape off the softened paint from the door’s surface. Be careful not to apply too much pressure as it may damage the door.
- Continue scraping until all the paint has been removed. You may need to repeat the process in stubborn areas or for multiple layers of paint.
- Dispose of the scraped-off paint properly, following your local regulations for hazardous waste disposal.
- Once the majority of the paint has been removed, use a clean cloth or sponge dipped in warm water to wipe away any remaining residue.
Neutralizing The Stripper
After successfully removing the paint, it’s important to neutralize the effects of the stripper to ensure a clean and paint-ready surface. Follow these steps:
- Fill a bucket with warm water and add a neutralizing agent, such as vinegar or baking soda, according to the product instructions.
- Using a clean cloth or sponge, thoroughly wash the door with the neutralizing solution. This will help remove any remaining stripper residue.
- Rinse the door with clean water to remove any traces of the neutralizing agent.
- Allow the door to dry completely before proceeding with any further steps, such as sanding or applying a new coat of paint.
By following these steps and taking the necessary precautions, you can effectively strip the paint from your door, leaving it ready for a fresh new look. Remember to always read and follow the instructions provided by the paint stripper manufacturer for the best results.
Cleanup And Disposal
To strip paint from a door, begin by applying a chemical paint stripper. After letting it sit, use a putty knife to scrape off the paint. Next, sand the door to remove any remaining paint and create a smooth surface for repainting.
Finally, dispose of the paint chips and chemical residue according to local regulations.
Disposing Of Chemicals
After successfully stripping the paint from your door, it’s crucial to properly dispose of the chemicals used in the process. Responsible disposal is not only important for environmental reasons but also for the safety of yourself and others. Here’s a step-by-step guide on how to dispose of the chemicals properly: 1. Check local regulations: Before disposing of any chemicals, it’s essential to check your local regulations regarding hazardous waste disposal. Different regions may have specific guidelines or designated facilities for chemical disposal. 2. Seal the containers: Make sure to tightly seal any containers holding the chemical stripper or other hazardous materials. This will prevent leaks or spills during transportation and disposal. 3. Label the containers: Clearly label the containers with the name of the chemical and any relevant warnings. This will help ensure that the contents are handled properly by waste management professionals. 4. Contact a waste management facility: Reach out to your local waste management facility or recycling center for guidance on proper disposal methods. They will provide you with information on drop-off locations or collection services for hazardous waste. 5. Follow their instructions: Follow the instructions provided by the waste management facility carefully. They may have specific guidelines on transportation, packaging, or additional precautions to take during the disposal process.Tool Maintenance Post-stripping
Once you have finished stripping the paint from your door, it’s important to properly clean and maintain your tools for future use. Proper tool maintenance ensures that your tools remain in good condition and ready for the next project. Here are some tips for maintaining your tools post-stripping: 1. Clean tools immediately: After completing the paint stripping process, clean your tools promptly to prevent any residue from hardening or causing damage. Use a mild detergent and warm water to remove any remaining paint or chemicals. 2. Dry thoroughly: After cleaning, make sure to dry your tools thoroughly to prevent rust or corrosion. Use a clean cloth to wipe off any excess moisture and leave the tools in a well-ventilated area until completely dry. 3. Lubricate moving parts: Apply a small amount of lubricant, such as oil or silicone spray, to the moving parts of your tools. This will help prevent rust and ensure smooth operation when using them in the future. 4. Store properly: Store your tools in a dry and secure place to protect them from dust, moisture, and potential damage. Consider using toolboxes, pegboards, or wall-mounted racks to keep your tools organized and easily accessible. 5. Regular inspections: Periodically inspect your tools for any signs of wear, damage, or malfunction. Replace any worn-out parts or damaged tools to maintain their effectiveness and safety. By following these guidelines for disposing of chemicals and maintaining your tools post-stripping, you can ensure a safe and efficient paint removal process while preserving the longevity of your tools.Finishing Touches
After stripping the paint from your door, it’s time to focus on the finishing touches to ensure a professional and polished result. This stage involves sanding for smoothness, priming, and painting the door to bring it back to its original beauty.
Sanding For Smoothness
Start by using medium-grit sandpaper to smooth out any remaining imperfections on the door’s surface. Work in the direction of the wood grain to avoid causing any damage. Afterward, switch to fine-grit sandpaper to achieve a perfectly smooth finish. Remember to wipe off any dust with a damp cloth before moving on to the next step.
Priming And Painting
Apply a coat of primer to the door to ensure proper adhesion of the paint and to provide a smooth base for the final finish. Once the primer is dry, use a high-quality paint to achieve the desired color and sheen. Apply the paint evenly with a brush or roller, allowing each coat to dry thoroughly before applying the next one. This will ensure a flawless and long-lasting finish.

Credit: irestorestuff.com
Prevention And Maintenance
Protective Coatings
Applying protective coatings to your door can significantly reduce the need for stripping paint in the future. Consider using high-quality varnishes or polyurethane to create a strong barrier against environmental elements.
Regular Maintenance Tips
Implementing regular maintenance practices can prolong the life of your door’s paint job. Here are some tips to follow:
- Inspect the door for chips and cracks annually.
- Keep the door clean by gently washing it with mild soap and water.
- Touch up any damaged areas promptly to prevent further deterioration.
Troubleshooting Common Problems
Strip paint from a door effortlessly with these troubleshooting tips. Remove old layers using a chemical paint stripper, scraping off the softened paint with a putty knife. Sand down any remaining residue for a smooth finish.
Stripping Stubborn Paint
If you encounter stubborn paint that is difficult to remove from your door, don’t worry. There are a few tricks you can try to make the process easier. One effective method is to use a heat gun. Simply apply heat to the paint until it softens and then scrape it off with a putty knife. Be careful not to overheat the area or damage the wood. Another option is to use a chemical paint stripper. Apply the stripper according to the manufacturer’s instructions and let it sit for the recommended amount of time. Then, use a scraper to remove the softened paint. Remember to wear protective gloves and goggles when working with chemicals.Dealing With Wood Damage
Sometimes, when stripping paint from a door, you may discover that the wood underneath has been damaged. This can be due to previous layers of paint, exposure to moisture, or other factors. If you notice any wood damage, it’s important to address it before proceeding. Start by filling any cracks or holes with wood filler. Use a putty knife to apply the filler and smooth it out. Allow it to dry completely before sanding the surface. Once the surface is smooth, you can continue with the paint stripping process. If the damage is significant, you may need to consider repairing or replacing the affected area of the door.Frequently Asked Questions
What Is The Easiest Way To Remove Paint From A Door?
The easiest way to remove paint from a door is by using a chemical paint stripper. Apply the stripper, let it sit, then scrape off the paint. Sand the surface for a smooth finish. Always follow safety instructions when using chemical strippers.
What Is The Quickest Way To Strip Paint?
The quickest way to strip paint is to use a chemical paint stripper. Apply it, wait, and then scrape off the paint. You can also use a heat gun or sandblasting for faster results. Always follow safety precautions when using these methods.
What Is The Best Paint Remover For Doors?
The best paint remover for doors is a chemical stripper. It effectively removes multiple layers of paint, making the process easier and faster. Be sure to follow the instructions carefully and use safety precautions while using the paint remover.
Should I Strip The Door Before Painting?
Yes, it is recommended to strip the door before painting. Stripping removes old paint, dirt, and imperfections, ensuring a smooth and long-lasting finish. It allows the new paint to adhere better and prevents any previous layers from peeling or affecting the final result.
Conclusion
Removing paint from a door can be a manageable task with the right tools and techniques. By following the steps outlined in this guide, you can effectively strip the paint from your door and achieve a smooth, clean surface. With patience and attention to detail, you can restore your door to its original beauty.