To sand cabinets for painting, start by removing the cabinet doors and hardware. Then, sand the surfaces with fine-grit sandpaper to smooth out imperfections and create a good base for painting.
Sanding will also help the paint adhere better and result in a professional-looking finish. Are you thinking about giving your kitchen cabinets a fresh new look with a coat of paint? Sanding the cabinets is a crucial step in the process that ensures a smooth and professional finish.
By following the correct sanding techniques, you can create an ideal surface for the paint to adhere to, resulting in a durable and attractive cabinet makeover. We’ll guide you through the steps to effectively sand cabinets for painting, helping you achieve a stunning transformation for your kitchen space.
Contents
Introduction To Cabinet Sanding
Importance Of A Smooth Base
Sanding cabinets is a crucial step in the painting process that helps create a smooth and even base for the new paint. Without proper sanding, the paint may not adhere well to the surface, leading to a less professional and durable finish.
Benefits Of Proper Sanding
Proper sanding of cabinets offers several benefits, including improved paint adhesion, the removal of old finishes and imperfections, and the creation of a clean and uniform surface for the new paint to adhere to. This results in a professional-looking and long-lasting paint job.
Tools And Materials Needed
When preparing to paint cabinets, having the right tools and materials is crucial for achieving a smooth and professional finish. Here’s a breakdown of the essential items you’ll need to sand cabinets effectively:
Choosing The Right Sandpaper
Before diving into the sanding process, it’s important to select the appropriate sandpaper grit for the job. Coarse grits such as 60 to 80 are ideal for removing old finish or heavy blemishes, while medium grits (100 to 150) are suitable for smoothing surfaces. Fine grits (180 to 220) are perfect for achieving a polished finish. Ensure you have a variety of sandpaper grits to cater to different stages of the sanding process.
Essential Sanding Equipment
Equipping yourself with the right tools will streamline the cabinet sanding process. Here’s a list of essential sanding equipment:
- Sanding blocks or sanding sponges
- Electric hand sander or orbital sander
- Dust mask and safety goggles
- Tack cloth for removing dust and residue
- Painter’s tape to protect surrounding areas
Preparation Steps Before Sanding
Before you start sanding your cabinets for painting, it’s important to properly prepare them. This will ensure that you achieve the best results and create a smooth, even surface for the paint to adhere to. Follow these essential preparation steps to ensure a successful cabinet sanding process.
Cleaning The Cabinets
Begin by thoroughly cleaning the cabinets to remove any dirt, grease, or grime that may have accumulated over time. Use a mild detergent mixed with warm water and a soft cloth to gently scrub the surfaces. Pay close attention to areas that are frequently touched, such as handles and knobs, as they tend to collect more dirt. Rinse the cabinets with clean water and allow them to dry completely before moving on to the next step.
Removing Hardware And Doors
Next, you’ll need to remove any hardware, such as knobs, handles, and hinges, as well as the cabinet doors. This will make the sanding process easier and allow you to reach all the nooks and crannies. Use a screwdriver or a drill to remove the hardware, and set them aside in a safe place. It’s a good idea to label each piece or keep them organized in separate containers so you can easily reassemble the cabinets later. Take off the cabinet doors by unscrewing the hinges and carefully lifting them away.
Once the hardware and doors are removed, place them on a clean and protected surface, such as a drop cloth or a plastic sheet, to prevent any damage during the sanding and painting process.
By cleaning the cabinets and removing the hardware and doors before sanding, you’ll create an ideal surface for the paint to adhere to. These preparation steps are crucial in achieving a professional-looking finish and ensuring the longevity of your newly painted cabinets.
Sanding Techniques For Cabinets
When it comes to preparing cabinets for painting, sanding is a crucial step that helps create a smooth and even surface. Proper sanding techniques can make a significant difference in the final result of your cabinet painting project. In this section, we will explore two popular sanding methods, hand sanding and power sanding, and discuss best practices for achieving even sanding.
Hand Sanding Vs. Power Sanding
Hand sanding and power sanding are two common techniques used for sanding cabinets. Let’s take a closer look at each method:
Hand Sanding
Hand sanding involves using sandpaper or sanding blocks to manually smooth the cabinet surfaces. This method provides better control and precision, especially when dealing with intricate details or hard-to-reach areas. Hand sanding is ideal for smaller projects or when you need to focus on specific spots that require extra attention.
Power Sanding
Power sanding, on the other hand, utilizes electric sanders to speed up the sanding process. These tools are equipped with various grits of sandpaper and can cover larger areas quickly. Power sanding is efficient for larger cabinet projects or when you need to remove old finishes or paint layers. However, it’s important to use caution and avoid applying excessive pressure to prevent damaging the cabinet surface.
Best Practices For Even Sanding
To achieve a smooth and even surface when sanding cabinets, it is essential to follow these best practices:
- Start with the right grit: Begin with a coarser grit sandpaper to remove any roughness or imperfections on the cabinet surface. Gradually progress to finer grits to achieve a smoother finish.
- Work in the direction of the grain: Sanding along the grain of the wood helps avoid creating scratches or uneven marks. Take your time and apply even pressure as you sand.
- Keep the surface clean: Regularly clean the cabinet surface with a tack cloth or a vacuum to remove any dust or debris. This ensures that the sanding process remains effective and prevents particles from getting trapped in the paint or finish.
- Inspect for smoothness: After sanding, run your hand across the cabinet surface to check for any remaining rough spots or inconsistencies. Sand those areas again if needed until you achieve a uniformly smooth feel.
By following these sanding techniques and best practices, you can ensure that your cabinets are properly prepared for painting, resulting in a professional and long-lasting finish.
Dealing With Detailed Areas
When it comes to sanding cabinets for painting, dealing with detailed areas can be a daunting task. It is essential to be meticulous in your approach to ensure that every corner and intricate design is adequately sanded before painting. In this section, we will cover two crucial areas to focus on when sanding cabinets: sanding cabinet corners and working around intricate designs.
Sanding Cabinet Corners
Cabinet corners can be challenging to sand, especially if they are tight or narrow. A sanding block or a sanding sponge can be useful tools to reach these areas. Make sure to sand in the direction of the wood grain to avoid causing damage to the surface. Sanding in circular motions can create scratches, making it difficult to achieve a smooth finish.
Working Around Intricate Designs
If your cabinet has intricate designs or carvings, sanding can be time-consuming. In these cases, a small piece of sandpaper can be useful, allowing you to reach tight areas and corners. It is also essential to be gentle when sanding intricate designs to avoid causing damage. Sanding too hard can lead to scratches, affecting the overall appearance of the cabinet.
When sanding intricate designs, a sanding sponge can be an excellent tool to use. The sponge can conform to the shape of the design, allowing you to sand every nook and cranny. It is essential to be patient and take your time when sanding intricate designs to achieve the best possible finish.
Overall, dealing with detailed areas when sanding cabinets requires patience, attention to detail, and the right tools. By focusing on sanding cabinet corners and working around intricate designs, you can achieve a smooth and professional-looking finish.
Safety Measures During Sanding
Prepare for sanding cabinets by taking safety precautions. Wear a dust mask and safety goggles to protect yourself from dust and debris. Ensure proper ventilation in the workspace and cover surrounding areas to minimize mess. Use a sander with a vacuum attachment to contain dust and work in a well-lit area to maintain visibility.
When it comes to sanding cabinets for painting, safety should always come first. Sanding involves the use of sandpaper to remove the existing finish on the cabinets, which can produce a lot of dust and debris. Inhaling this dust can cause serious health issues such as respiratory problems. Therefore, it is crucial to follow proper safety measures during sanding. Here are some important safety measures you should take during sanding:
Protective Gear
Wearing protective gear is crucial during sanding to avoid inhaling dust and debris. The following protective gear should be worn:
- Dust mask or respirator to avoid inhaling dust and debris.
- Safety goggles to protect your eyes from dust and debris.
- Earplugs or earmuffs to protect your ears from loud noise produced by sanding equipment.
- Gloves to protect your hands from sharp edges of the cabinets.
Ventilation And Dust Control
Proper ventilation and dust control are essential during sanding to avoid inhaling dust and debris. You can follow these steps to ensure proper ventilation and dust control:
- Open windows and doors to allow fresh air to circulate.
- Use a fan to blow dust and debris away from your work area.
- Cover any vents or air ducts in the room to prevent dust from spreading throughout the house.
- Use a vacuum or dust collection system to collect dust and debris produced during sanding.
By following these safety measures during sanding, you can protect yourself from inhaling harmful dust and debris. Always remember to wear protective gear and ensure proper ventilation and dust control to make your sanding project a safe and successful one.
Post-sanding Cleanup
Achieving a clean post-sanding cleanup is essential when preparing cabinets for painting. Properly removing dust and debris ensures a smooth surface for the paint to adhere to, resulting in a professional finish. Follow these steps to effectively clean up after sanding your cabinets.
Removing Dust And Residue
After sanding your cabinets, it’s important to thoroughly remove any dust and residue to ensure a smooth and clean surface for painting. Dust particles can ruin the finish of your newly painted cabinets, so taking the time to properly clean up is essential.
To remove the dust, start by using a soft-bristle brush or a vacuum cleaner with a brush attachment to gently sweep away loose particles. Pay special attention to the corners and crevices where dust tends to accumulate.
Next, wipe down the cabinets using a tack cloth or a microfiber cloth slightly dampened with water. Make sure to wring out the cloth well to avoid excess moisture, as it can damage the wood. Wipe in the direction of the wood grain to avoid leaving streaks.
For stubborn residue, you can use a mild detergent mixed with water. Apply the solution to a clean cloth and gently scrub the affected areas. Be careful not to scrub too hard, as it may damage the wood surface. Once the residue is removed, wipe the cabinets again with a clean, damp cloth to remove any soapy residue.
Prepping For Painting
Now that you’ve successfully cleaned up the dust and residue, it’s time to prepare your cabinets for painting. Proper preparation is crucial to ensure the paint adheres well and provides a long-lasting finish.
Start by inspecting the cabinets for any imperfections, such as dents, scratches, or holes. Fill these areas with a wood filler or putty, following the manufacturer’s instructions. Once the filler is dry, gently sand it until it’s smooth and level with the surrounding surface.
Next, lightly sand the entire cabinet surface using fine-grit sandpaper. This will create a slightly rough texture that helps the paint adhere better. Be sure to sand in the direction of the wood grain and avoid applying too much pressure, as it can damage the wood.
After sanding, wipe away any dust using the same techniques mentioned earlier. Ensure the cabinets are completely dry before moving on to the next step.
Finally, apply a primer to the cabinets to create a smooth and even base for the paint. Priming not only helps the paint adhere better but also prevents any stains or discoloration from bleeding through. Choose a primer specifically formulated for wood surfaces and follow the manufacturer’s instructions for application.
Once the primer is dry, your cabinets are ready for painting. Follow the painting instructions carefully, using a high-quality paintbrush or a paint sprayer for the best results.
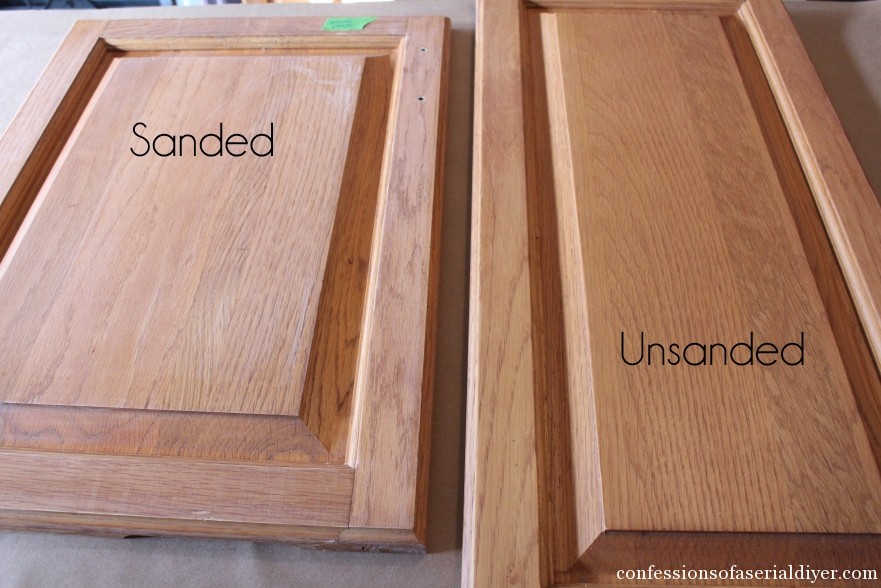
Credit: www.confessionsofaserialdiyer.com
Priming Your Cabinets
Before you start painting your cabinets, it’s crucial to prime them first. Priming not only helps the paint adhere better to the surface but also provides a smooth and even finish. In this section, we will explore the importance of choosing the right primer and share application tips for achieving a flawless result.
Choosing The Right Primer
Selecting the appropriate primer for your cabinets is key to achieving a long-lasting and professional-looking paint job. Consider the following factors when choosing a primer:
- Type of Surface: Determine whether your cabinets are made of wood, laminate, or another material. Different surfaces may require specific types of primer.
- Primer Formula: Look for a high-quality primer designed for cabinets. Opt for an oil-based primer for wood cabinets and a bonding primer for laminate or glossy surfaces.
- Stain Blocking: If your cabinets have stains or discoloration, choose a primer that offers excellent stain-blocking properties to prevent any discoloration from bleeding through the paint.
Application Tips For A Smooth Finish
Now that you have chosen the right primer for your cabinets, it’s time to apply it for a flawless finish. Follow these application tips:
- Clean and Prepare the Surface: Before applying the primer, ensure the cabinets are clean and free from grease, dirt, and other contaminants. Sand any rough areas and wipe away the dust.
- Use a High-Quality Brush or Roller: Invest in a good quality brush or roller specifically designed for priming and painting cabinets. This will help you achieve a smooth and even application.
- Apply Thin and Even Coats: Rather than applying one thick coat, it’s better to apply multiple thin coats of primer. This ensures better coverage and avoids drips or uneven drying.
- Sand Between Coats: After each coat of primer has dried, lightly sand the surface with fine-grit sandpaper. This helps create a smooth texture and improves paint adhesion.
- Allow Proper Drying Time: Follow the manufacturer’s instructions for drying time between coats. Rushing the process may result in a less durable finish.
By selecting the right primer and following these application tips, you can ensure that your cabinets are properly prepared for painting. This will help you achieve a professional-looking finish that will stand the test of time.
Final Touches Before Painting
Before painting your cabinets, it’s crucial to ensure that the surfaces are perfectly prepped for a flawless finish. The final touches before painting will make all the difference in achieving professional-looking results. In this section, we’ll cover the essential steps to inspect the surface, tackle minor imperfections, and prepare your cabinets for the perfect coat of paint.
Inspecting The Surface
Start by examining the cabinet surfaces for any remaining blemishes, rough patches, or residue from the sanding process. Use a clean, lint-free cloth to wipe down the cabinets, ensuring that no dust or debris is left behind. This meticulous inspection will guarantee a smooth foundation for the paint application.
Tackling Minor Imperfections
If you spot any minor imperfections such as dents or scratches, fill them with a high-quality wood filler. Once the filler is dry, gently sand the area to achieve a seamless and level surface. This attention to detail will result in a flawless paint finish without any visible flaws.

Credit: www.nortonabrasives.com

Credit: www.nortonabrasives.com
Frequently Asked Questions
Do You Need To Sand Cabinets Before Painting?
Yes, it is recommended to sand cabinets before painting them. Sanding helps to remove any existing finish, roughen up the surface for better paint adhesion, and smooth out any imperfections. This will result in a smoother and more professional-looking finish.
What Is The Fastest Way To Sand Cabinets?
The fastest way to sand cabinets is to use an electric sander with coarse-grit sandpaper. Start with the doors and drawer fronts, then move to the cabinet frames. Sand in the direction of the wood grain for best results.
What Grit Is Best For Sanding Cabinets To Paint?
The best grit for sanding cabinets before painting is 120 to 150. This grit effectively smoothens the surface for optimal paint adhesion.
What Kind Of Sander Is Best For Cabinets?
A random orbital sander is the best option for cabinets. It can sand the surface without leaving swirl marks. Additionally, it has a dust collection system that helps keep the work area clean.
Conclusion
To sum up, sanding cabinets for painting is a crucial step that shouldn’t be overlooked. By following the proper techniques and using the right tools, you can achieve a smooth and even surface that is perfect for painting. Remember to take your time, be patient, and avoid rushing the process.
With a little effort and attention to detail, you can transform your cabinets into a beautiful and updated feature in your home. Happy sanding and painting!