To make reflective paint, mix glass beads or retroreflective powder with paint. Apply the paint to the desired surface and allow it to dry.
This will create a reflective surface that shines when light hits it. Reflective paint is commonly used for safety purposes, such as on road signs and markers, as well as on clothing and accessories for increased visibility during low-light conditions.
Reflective paint is an innovative and practical solution for enhancing safety measures in various settings. Whether it is for road signs, bikes, helmets, or clothing, reflective paint can provide an extra layer of visibility in low-light conditions. The paint works by reflecting light back to its source, making it an effective tool for improving safety in areas with poor visibility. Making reflective paint involves mixing glass beads or retroreflective powder with paint and applying the mixture to the desired surface. This creates a reflective surface that shines brightly when light hits it. We will explore the process of making reflective paint and the benefits of using it in different settings.
Contents
Introduction To Reflective Paint
Reflective paint is a popular solution for enhancing visibility in low light conditions. Making reflective paint is a simple process that involves mixing reflective powder with regular paint. This DIY solution can be used on various surfaces, including clothing, bicycles, and signs.
Why Choose Reflective Paint?
Reflective paint offers numerous benefits, making it an ideal choice for various applications. Whether you’re enhancing the visibility of road markings, creating safety signage, or adding flair to artwork, reflective paint stands out for its ability to reflect light, increasing visibility in low-light conditions. The highly reflective nature of this paint makes it an excellent option for improving safety and increasing visibility, making it a popular choice for a wide range of projects.
Basic Principles
The basic principles of reflective paint involve incorporating reflective materials into the paint formula. These materials may include glass beads, micro prismatic technology, or other reflective additives that enhance the paint’s ability to reflect light. The key to creating effective reflective paint lies in the proper dispersion and adhesion of these reflective materials within the paint matrix, ensuring optimal reflective properties.
Materials Needed
To make reflective paint, you will need materials such as reflective powder, clear paint medium, and a mixing container. These items can be easily sourced from craft stores or online suppliers. Mixing reflective powder with the clear paint medium creates a reflective paint that can be used for various DIY projects.
Making reflective paint is a great way to add safety and visibility to various objects and surfaces. To make reflective paint, you will need the following materials:Choosing The Right Base Paint
The first step in making reflective paint is choosing the right base paint. The base paint serves as the background for the reflective powder. It’s important to choose a base paint that is compatible with the reflective powder and has good adhesion to the surface you will be painting. Here are some options for base paints:- Acrylic paint
- Latex paint
- Spray paint
- Chalkboard paint
Selecting Reflective Powder
The reflective powder is the key ingredient in reflective paint. It reflects light and makes the painted surface visible in low-light conditions. There are different types of reflective powders available, including glass beads and microspheres. Here are some factors to consider when selecting reflective powder:| Factor | Considerations |
|---|---|
| Color | Reflective powders come in different colors, including silver, white, yellow, and green. Choose a color that contrasts with the base paint and is visible in the intended lighting conditions. |
| Size | Reflective powders come in different sizes, ranging from 10 microns to 1000 microns. Choose a size that is suitable for the surface you will be painting and the level of reflection you want to achieve. |
| Quality | Choose a high-quality reflective powder that is durable and has good reflective properties. Look for powders that are specifically designed for use in paint. |
Preparation Steps
Preparation is key when it comes to making reflective paint. By carefully following the safety measures and setting up your workspace correctly, you can ensure a smooth and successful paint-making process.
Safety Measures
- Wear protective clothing such as gloves and safety goggles to prevent any skin or eye contact with the chemicals.
- Work in a well-ventilated area to avoid inhaling any fumes from the paint-making materials.
- Keep a fire extinguisher nearby as a precautionary measure in case of any accidents.
- Store all chemicals in a secure location away from children and pets.
Workspace Setup
Before you begin making reflective paint, it’s essential to set up your workspace properly. Here’s a simple checklist to ensure your workspace is ready:
- Clear the area of any clutter to provide ample space for your paint-making materials.
- Place all necessary tools and equipment within easy reach to streamline the process.
- Cover the work surface with a protective layer such as a plastic sheet to prevent any spills or stains.
- Ensure adequate lighting to clearly see and measure the ingredients for the reflective paint.
- Double-check the functionality of all tools and equipment before starting the paint-making process.
Mixing Your Reflective Paint
When it comes to mixing your reflective paint, it’s crucial to get the proportions and measurements just right. Additionally, stirring techniques play a key role in ensuring the reflective particles are evenly distributed. Let’s dive into the details of mixing your reflective paint.
Proportions And Measurements
To create an effective reflective paint, proper proportions and measurements are essential.
- Reflective Powder: Add 4 tablespoons of reflective powder to 1 cup of clear paint.
- Clear Paint: Use a high-quality clear paint to ensure the reflective properties shine through.
- Measuring Tools: Utilize precise measuring tools to maintain the correct ratios.
Stirring Techniques
Stirring the reflective paint mixture correctly is vital for achieving optimal results.
- Gentle Stirring: Begin by gently stirring the mixture to prevent the reflective particles from clumping together.
- Consistent Stirring: Ensure consistent stirring to evenly distribute the reflective powder throughout the paint.
- Thorough Mixing: Take the time to thoroughly mix the paint to guarantee uniform reflectivity.
Application Techniques
Discover the secrets of creating your own reflective paint with these expert application techniques. Learn how to make your surfaces stand out with a unique, shimmering effect that catches the eye. Illuminate your surroundings and make a statement with homemade reflective paint.
When it comes to applying reflective paint, it’s important to know the proper techniques in order to achieve the desired effect. Here are some tips on surface preparation, applying multiple coats, and more.Surface Preparation
Before applying reflective paint, it’s crucial to properly prepare the surface. This includes cleaning the surface of any debris or dirt, as well as ensuring that it’s dry and free of any oils or other contaminants. If necessary, use a sandpaper to roughen up the surface for better adhesion. A clean and smooth surface will ensure that the reflective paint adheres properly and lasts longer.Applying Multiple Coats
When applying reflective paint, it’s important to apply multiple coats to ensure optimal reflectivity. Start with a base coat and allow it to dry completely before applying additional coats. Depending on the type of reflective paint being used, it may take several coats to achieve the desired level of reflectivity. Be sure to follow the manufacturer’s instructions for the recommended number of coats.Techniques For Applying Reflective Paint
When applying reflective paint, it’s important to use the right technique to achieve the best results. Here are some tips:- Use a high-quality brush or roller to apply the paint evenly.
- Apply the paint in thin, even coats to prevent drips and ensure proper adhesion.
- Avoid applying too much paint at once, as this can lead to uneven drying and poor adhesion.
- Allow each coat to dry completely before applying the next coat.

Credit: m.youtube.com
Drying And Curing
When it comes to making reflective paint, the drying and curing process is crucial to ensure the paint’s effectiveness and durability. Proper drying and curing allow the reflective particles to set and bond to the surface, enhancing the paint’s reflective properties and longevity.
Time Requirements
Reflective paint typically requires 24 to 48 hours to dry completely. However, the curing process continues after the initial drying period. To achieve optimal results, the paint should be allowed to cure for 3 to 7 days before exposing it to heavy use or harsh conditions. This timeframe may vary based on the specific product used, so always refer to the manufacturer’s guidelines for accurate time requirements.
Ensuring Proper Curing
Proper curing is essential for the reflective paint to reach its maximum durability and reflectivity. During the curing period, it’s crucial to protect the painted surface from moisture, rain, and extreme temperature changes. Applying a clear protective sealant after the paint has dried can further enhance its durability and longevity, ensuring that the reflective properties remain effective for an extended period.
Testing The Reflectivity
After making your own reflective paint, it’s essential to test its effectiveness to ensure it meets your requirements. Testing the reflectivity of the paint can be done using different methods. In this section, we will explore the various ways you can test the reflectivity and how to adjust it to achieve optimal results.
Methods To Test
When it comes to testing the reflectivity of your paint, there are a few simple yet effective methods you can use. Let’s take a look at these methods:
- Visual Inspection: The easiest way to determine the reflectivity of your paint is through visual inspection. Take the painted surface and observe how light reflects off it. If the paint appears bright and reflects light effectively, it’s a good indication of its reflective properties.
- Flashlight Test: Another method is to use a flashlight to check the reflectivity. Simply shine a flashlight onto the painted surface and observe how the light bounces back. A highly reflective paint will reflect the light back in a noticeable and bright manner.
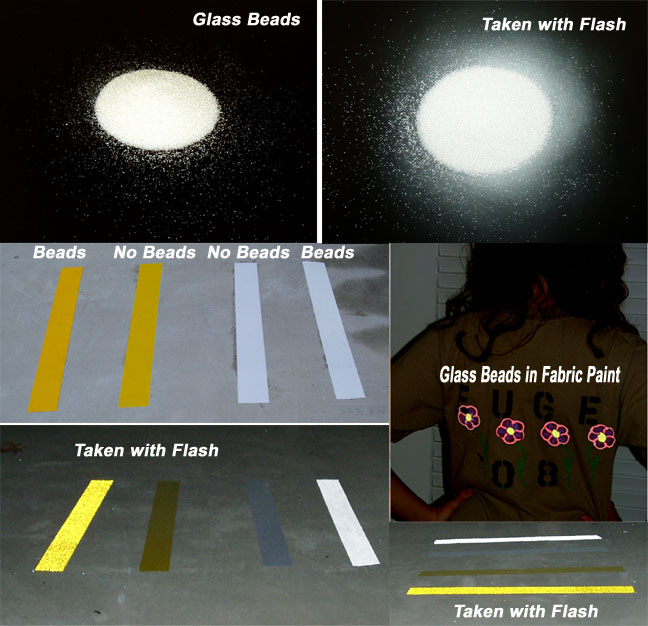
- Photographic Test: Taking a photograph of the painted surface can also help evaluate its reflectivity. When capturing an image with a flash, a reflective paint will create a bright and well-defined reflection in the photo.
Adjusting Reflectivity
If you find that the reflectivity of your paint is not up to your desired level, there are ways to adjust it. Here are some methods to enhance the reflectivity:
- Increasing the Paint Layers: Applying additional layers of reflective paint can enhance the overall reflectivity. The more layers you add, the brighter the reflection will be.
- Using High-Quality Reflective Additives: Opting for high-quality reflective additives when making the paint can significantly improve its reflectivity. These additives are specifically designed to enhance reflection.
- Choosing a Different Base Paint: The type of base paint used can also impact the reflectivity. Experimenting with different base paints to find the one that provides the best reflective properties can be beneficial.
By testing and adjusting the reflectivity of your paint, you can ensure that it meets your specific requirements and provides the desired level of visibility. Whether you need reflective paint for safety purposes or artistic projects, these methods will help you achieve the desired results.
Credit: www.colebrothers.com
Maintenance And Care
To make reflective paint, mix glass microspheres into regular paint for increased visibility at night. Apply the paint to bicycles, helmets, or road signs for safety and visibility in low-light conditions. Regular maintenance and care will ensure the longevity of the reflective paint’s effectiveness.
Proper maintenance and care are essential for ensuring the longevity and effectiveness of reflective paint. By following some simple cleaning tips and touch-up strategies, you can keep your reflective paint looking vibrant and functioning optimally for an extended period.
Cleaning Tips
Regular cleaning of the reflective paint surface is vital to remove dirt, dust, and other debris that can diminish its reflective properties. Here are some effective cleaning tips:
- Use a mild detergent and water solution to gently scrub the reflective paint surface.
- Rinse the surface thoroughly with clean water to remove any remaining soap residue.
- Avoid using abrasive cleaning tools or harsh chemicals that can damage the reflective paint.
- Inspect the surface for any stubborn stains or debris that may require additional cleaning attention.
Touch-up Strategies
Over time, reflective paint may experience wear and tear, requiring touch-up to maintain its reflective quality. Here are some effective touch-up strategies:
- Clean the area needing touch-up following the recommended cleaning tips.
- Apply a small amount of reflective paint to the damaged or faded areas using a fine brush or applicator.
- Allow the touch-up paint to dry thoroughly before exposing it to regular use and environmental elements.
- Inspect the touch-up areas regularly to ensure the reflective paint remains in optimal condition.
Creative Uses For Reflective Paint
Reflective paint is not only useful for safety purposes, but it also has creative applications. Making reflective paint is easy and can be done by mixing reflective powder with regular paint. You can use it to create eye-catching designs on clothing, accessories, and even outdoor decor.
Creative Uses for Reflective Paint Reflective paint is a versatile and affordable way to add a unique touch to your DIY projects. From safety applications to home décor, reflective paint can be used in a variety of creative ways. In this post, we will explore some of the most interesting and innovative uses for reflective paint. Home Decor Ideas Reflective paint can add a modern and sophisticated touch to your home décor. Here are some creative ideas to get you started: – Paint a feature wall in your living room with reflective paint to create a stunning focal point. – Add reflective paint to your furniture to create a unique and eye-catching piece. – Use reflective paint on your light switch plates to add a subtle glow to your room. Safety Applications Reflective paint is also a great way to increase safety in low light conditions. Here are some practical applications of reflective paint: – Paint your bike frame with reflective paint to increase visibility when riding at night. – Add reflective paint to your jogging gear to increase visibility when running in low light conditions. – Use reflective paint to mark a path or driveway to improve safety for pedestrians and drivers. In conclusion, reflective paint is a versatile and affordable way to add a unique touch to your DIY projects. Whether you’re looking to add a modern touch to your home décor or increase safety in low light conditions, reflective paint is a great option. So, get creative and start painting!
Credit: www.youtube.com
Frequently Asked Questions
How Do You Make Reflective Paint?
To make reflective paint, mix reflective glass beads or powder with clear paint or varnish. Stir the mixture thoroughly until the beads or powder are evenly distributed. Apply the paint to the desired surface and allow it to dry. The reflective properties of the paint will become apparent when light is shone on it.
What Are The Uses Of Reflective Paint?
Reflective paint has various uses. It is commonly used for road markings, traffic signs, and safety equipment. It can also be used for decorative purposes, such as creating unique designs on walls or furniture. Reflective paint increases visibility in low-light conditions, making it ideal for enhancing safety in various applications.
How Does Reflective Paint Work?
Reflective paint contains tiny reflective glass beads or powder that act as retroreflectors. When light hits the paint, it reflects back towards the source, making it appear brighter. The beads or powder in the paint help to redirect the light, increasing visibility and making objects coated with reflective paint more easily seen in the dark.
Conclusion
Making reflective paint is a simple and cost-effective way to enhance visibility and safety. By following the step-by-step process outlined in this guide, you can create your own reflective paint at home. Whether for DIY projects or professional applications, this reflective paint offers a practical solution for various needs.